
nightbot.tv is one of the most common chatbots for Twitch, it has some excellent features which will help you manage the live stream more easily, have more fun, and allow you to offer a higher quality stream.
Chatbots are crucial tools used by streamers to have more control over their streams and I would definitely recommend you install one as soon as possible.
Some of the main features that Nightbot offers include;
- Automatic timed commands
- Spam Filters
- Chat Logs
- Sone Requests
- Giveaways
- and much more features.
In this guide, we will go through how to add Nightbot to Twitch, we will go through the different steps from installing Nightbot on your live stream to setting up the different features to get Nightbot working on your live stream in no time.
How to setup Nightbot on Twitch
Installing Nightbot on your channel is a fairly quick process, presuming you have a twitch account already created, you will just need to create a Nightbot account and link it to your Twitch account.
1. Log in to your Twitch account
2. Navigate to https://nightbot.tv and log in using the “Login with Twitch” button, you will need to authorize the connection between Nightbot and Twitch in order for the chatbot to work.


3. Once you have logged into NightBot, you can click on the “Join Channel” button to connect Nightbot to your Twitch channel.

4. Enter “/mod Nightbot” in the chat to mod the Nightbot and give it permission to execute the commands which you request. Nightbot will return a “granted moderator privileges” message to confirm it has worked.

5. Test the Nightbot is working correctly by using a default command (“!commands”) in the chat.
If the Nightbot responds to the command in chat then you have now successfully installed Nightbot on your Twitch Channel.

If you don’t get a response from NightBot, restart your browser and test again. If this still doesn’t work, click on the “Part Channel” button and start again.
Congratulations, you have successfully installed Nightbot on your Twitch channel.
Now you can set up commands and other features to help manage chat and improve the quality of your live stream.
How to set up Nightbot Default Commands on Twitch
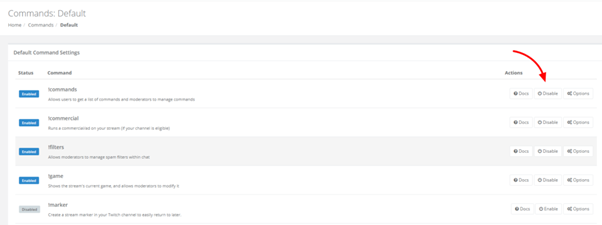
Default Commands are available on the Nightbot dashboard under Commands -> Default.
This default commands list has the name of the command, command description, and different action buttons which allow you to configure the commands.
The different accounts buttons are;
Docs
This allows you to open and read the official documentation for the command, which explains how the command works
Enable/Disable
This allows you to enable or disable the ability to execute the command on your stream.
Options
This allows you to change the configuration of the command.
The two options are;
- Userlevel – This allows you to restrict which users can use the command.
- Cooldown – This allows you to set the minimum amount of time (in seconds) before the command can be repeated.
Once you have configured the default commands once you shouldn’t need to change the default commands again, however, you can always come back and make changes if/when you need to.
How to set up Nightbot Custom Commands on Twitch
This is where things start to get a little interesting, Custom commands allow you to make unique commands for your live stream, popular custom commands include;
- !uptime – Shows a timer for how long the streamer has been live.
- !followage – This shows how long a person has been a follower of the channel.
- !social – Show links to social media accounts.
- !merch – Shows links to the streamers merchandise store.
- !spec – Shows the streamers gaming and streamer set up.
- !sr – used as an alias for the default command “!songsrequest”.
Check out our comprehensive list of the Best Nighbot Commands.
Custom Commands can be created or managed in the Nightbot dashboard under Commands -> Custom
Creating a new custom command can be done by clicking on the add command button, this will open a popup screen that will let you configure the custom command.
The different options available for configuring the custom command are;
- Command – This is the name of the command which the viewers will use to execute the command.
- Message – This is the response the Nightbot will return when the command is executed. A list of Command Variables are available by Nightbot to create dynamic responses.
- Userlevel – This allows you to restrict which users are able to execute this command.
- Cooldown – This is the minimum amount of time in seconds before the command can be executed again.
- Alias – This allows you to set this command as an alias command which executes a different command. For example, “!sr” could be an alias for the command “!songs request”.

How to set up Nightbot Giveaways on Twitch
A great feature for Nightbot is to allow giveaways in your live stream, using the Nightbot Giveaways dashboard you are able to create different types of giveaways and restrict which users are able to enter.
The Giveaways panel is split into different sections;
Eligibility List
This list shows the current pool of users who are eligible to win the current giveaway.
This automatically updates when more users enter the giveaway, Users which are eligible will have a blue symbol next to their name.
you can also manually edit if a user is eligible for the giveaway and reset the entire eligible list if you want to start a new giveaway.
Giveaway Panel
The Giveaway panel allows you to set the options and rules for the giveaway, the different options are;

Eligibility
The Eligibility Selector allows you to choose which Userlevels are eligible to participate in the giveaway. The user only requires one of the selected options to be eligible. For example, if Subscribers and Users were both selected it will allow users with either Userlevels to participate in the giveaway.
Giveaway Type
The Giveaway type allows you to change the style of the giveaway depending on what you require, you can do three different giveaway types;
- Active User – This will randomly select a user in the eligibility list that has spoken during the selected time duration.
- Keyword – This will allow you to set a specific keyword which the viewers need to type in chat to be eligible to win. Note. Changing the keyword will automatically reset the eligibility list.
- Random Number – This generates a random number between a range of numbers you select, The first user to type in the correct number is the winner.
Other options which you can configure in the Giveaway Type screen are;
- Subscriber Luck – This allows you to give subscribers more entries into the giveaway. Use the Slider to determine how many additional entries subscribers have.
- Regular Luck – This allows you to give Regulars more entries into the giveaway. Adjusting the slider will determine how many additional entries they receive.
Chat
The chat window allows you to read chat while doing giveaways.
Nightbot Logs
The logs will automatically log the chat history of your stream.
You can also search the logs and filter by viewer name or message, which is excellent if you need to check what a specific viewer has said.
Nightbot Regulars
The Regulars screen allows you to assign trusted viewers with a new Userlevel.
Regulars can be granted extra permissions for commands, spam protection, and increased luck in giveaways.
How to set up Nightbot Twitch Song Requests
The song requests feature in Nightbot allows your viewers to submit a song request via the chat, the song will then be queued on the AutoDJ page.
You will need to enable song requests by clicking the “Enable” button on the AutoDJ page before viewers are able to start requesting songs.
Song Requests work by first using a default playlist which it will play through when no requested songs are queued, once a song is requested it will be queued above the default playlist songs but below other requested songs in the list.
Songs can be requested by the viewer using the command !songrequests in the chat, however, it’s common for streamers to create a custom command !sr for ease of use.
Song Requests AutoDJ
The AutoDJ is the player responsible for Song Requests in Nightbot, the page contains the song request settings, a music player with controls, and the queue of the upcoming songs.
Settings
There are three buttons at the top of the page which allows you to manage the playlist and song requests;
- Enable / Disable – This setting allows you to enable or disable new requests from being added to the queue.
- Clear Queue – This will clear the songs currently in the queue.
- Request Song – This will allow you to add a song to the request. Songs can be requested by entering the direct url from SoundCloud or YouTube.
There is also a settings control button at the top of the page which will open a settings popup so you can change the settings for how the song requests function works on your live stream.
Some settings such as minimum Userlevels, Limits for the Queue Length, and User Limits can be really useful to help enhance the live stream and create more viewer engagement.
All the settings on the screen are as follows;
General
- Userlevel – This allows you to change the minimum Userlevel required for a viewer to submit a song request. This is a useful setting if lower quality / spammy song requests are being submitted, For example. Song requests for subscribers only.
Note – Don’t restrict all viewers from being allowed to submit song requests unless you are unable to manually moderate the playlist as it’s a small price to pay for creating greater interaction from the chat. - Providers – This allows you to select which provider you allow song requests from, currently Soundcloud and Youtube are the only providers which you can permit.
- Playlist – Playlist allows you to select which playlist you want the AutoDJ to pull songs from when adding to the queue.
The three options available are; Channel, Monstercat, and Twitch Music Library.
Monstercat and Twitch Music Library are external playlists which cannot be edited, Channel playlist is your own custom playlist which means you can add and remove songs to the playlist. - Search Provider – This setting allows you to select which search provider is used when the viewer requests a song by keyword instead of a url.
I would recommend you keep this on the default YouTube setting.
Limits
- Queue Length – This setting allows you to limit the amount of songs which are able to be queued in the AutoDJ player.
This I would recommend to keep at 20 unless you are able to easily keep up with moderation of the song requests and want to allow more people to submit requests. - Limit to Playlist – This setting allows you to limit the songs requested to be within the Twitch Music Library playlist.
I would recommend you keep the default option and keep this unticked. - User Limit – This setting allows you to set the amount of song requests each user is allowed to submit.
Increasing this limit can help with chat engagement if you have a lower amount of viewers who are requesting songs. - Exempt Userlevel – This setting allows you to set which users are exempt from the above user limits.
This works well to allow moderators to be able to add an unlimited amount of songs even when the queue limit has been reached, so they are able to help moderate the song requests for you.
- Limit to Music – This setting allows you to restrict any videos which are not in the Music category from being added to the queue.
I would recommend to keep this unticked as a lot of song videos on YouTube are not in the Music category and will be incorrectly rejected. - Limit to Liked Videos – This setting will only allow YouTube videos with more likes than dislikes to be accepted and added to the queue.
I would recommend you keep this option ticked as it covers the vast majority of music videos and you can always manually add the song if it’s genuine.
Player Controls & Song Information
The AutoDJ screen has a built-in media player with controls that allows you to control the current song being played, you are able to;
- Play/Pause the current song
- Skip song to the next song in the queue
- Change the volume of the player.

There is also a details section which includes the song information;
- Song/Video Name
- Video Length
- Url of the song
- User who requested the song
- “Save to Channel Playlist” button allows you to add the song to your default channel playlist.
Queue
The queue shows you a list of all the songs currently queued, if there are no requested songs in the queue, the queue will be populated by songs from your selected playlist.
When a requested song is in the playlist you can promote the requested song to first in the queue or you can instead delete the song from the queue.
Song Requests Playlist
The Playlists screen allows you to see the current songs which are in your selected playlist, playlist selection can be changed in Song Requests -> AutoDJ -> Settings -> Playlist.
The Monstercat and Twitch Music Library are both uneditable playlists, therefore the playlist will simply show the songs in the selected playlist.
If you have selected the Channel playlist then you have the ability to manage the songs on the playlist using the action buttons;
- Clear Playlist – This will clear all songs and empty the playlist.
- Import – This lets you import all songs in a playlist from Soundcloud or YouTube to your Channel playlist. Tip. You can find Royalty Free playlists on YouTube which work well.
- Add Song – This allows you to add a song to the playlist using a Soundcloud or YouTube URL.
How to set up Nightbot Spam Protection
Spam Protection allows you to automatically deal with spam in your chat, This is an easy way to keep high-quality chat in the stream and avoids the need to completely moderate the chat while streaming.
Without the use of Spam Protection, your stream can very quickly become overrun with emotes and other one-liner spammy messages, which can make managing and interacting with chat very difficult.
Some streamers like to have their chat filled with emotes and full caps messages, while other streamers enjoy a more conversational and interactive chat.
The spam Protection screen shows a list of the filters which are available to be used; detailing the filter name, filter description, and buttons to manage the filter.
The buttons to manage the filters are;
- Docs – This is the official documentation for the Filter.
- Enable/Disable – This lets you enable or disable the filter from being used by the spam protection.
- Options – This allows you to change the settings for each filter, options which can be changed include;
- Timeout Length which can set the length of time a user is timeout when committing an offense). I recommended to lower this timeout for the minor offenses.
- Silent – This can be used to silence the filter message, which is very handy to reduce clutter in chat.
The filters which are available to use in the Spam Protection are;
- Blacklist Words/Phrases – This Filter allows you to blacklist specific words, phrases, and patterns. It’s common for streamers to include racist, sexist or political words in this blacklist.
In the options you can tick the Check Username options to have Nightbot check the user’s name against the blacklist too. - Excess Caps – This Filter allows you to timeout users who use an excessive amount of capital letters in their message.
This is a minor offence and therefore would recommend you reduce the Timeout Length to no more than 60 seconds instead of the default 600 seconds. - Excess Emotes – The filter allows you to timeout users who use an excessive amount of emotes in their message.
Again this is typically a minor offence and i would recommend lowering the Timeout Length to 60 seconds instead of the default 600 seconds. - Links – The Links Filter allows you to timeout users who are posting links in your chat, If you enable Song Requests, YouTube and Soundcloud links will be permitted.
If you have links which you would like to allow in the chat you can add them to the Whitelist box in the filter options screen, common allowed links are “youtube.com” and “twitter.com”.
I would also recommend reducing the Timeout Length in the filter options to 60 seconds instead of the default 600 seconds as this is a minor offense. - Excess Symbol – This filters allows you to timeout users who are spamming excessive symbols.
- Repetitions – This filter allows you to timeout users who repeat the same word or phrases in a message, this filter is disabled by default and in most cases would never be required.
How to set up Nightbot Timers
Timers in Nightbot allows you to put a message in chat or execute a command on a timer.
Some of the common timers which you can set up are;
- Social links – Post links to your social media accounts.
- Follow reminder – Reminds viewers to hit the follow button if they’re enjoying the stream.
- Recent YouTube video – You can remind viewers of your recent YouTube video and link the URL
- General chat notifications – If you have any general notifications or streamer/channel news.
You can create a timer by clicking the “Add” button and entering the timer details and settings.
- Name – This is the name of the timer, it’s not a command and it’s only job is to let you know what the timer does in the timers list.
- Message – This is the timers response message which will show in chat, command variables can be used to make dynamic responses.
- Interval – This is the interval at which the timer repeats.
- Chat Lines – This is the amount of chat lines (per 5 minutes) required before the timer will activate.
This is important to use when the chat is moving slowly to avoid Nightbot spamming your chat with messages. - Alias – If you want the timer to call a specific command, You can specify what command to call here.
Conclusion
Nightbot is a very powerful chatbot that can really help make your stream higher quality, I hope you now have an understanding of the basic features available in Nightbot and how to set them up and use them.
There are many other advanced features that you can set up within Nightbot to accomplish a whole range of different functions.
If you have any questions or suggestions regarding this Night bot for Twitch tutorial, please let me know in the comments section below.
